Directional Zoom Unity Asset
Demo / Tutorial
Asset Introduction
Unity Camera zooms in all directions, which for most of the time is not what you want.
- for example, in a 2D platformer, you want the camera to zoom out only from the top, showing more sky BUT not more ground.
with this asset, simply add a component to the camera, and now, the camera zooms only in the direction you want without adding or changing any code.
- it also comes with a smooth zoom component, allowing you to smoothly zoom by calling a single method.
Documentation
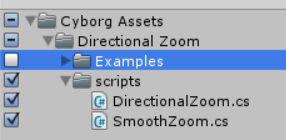
1. Import
You can skip or delete the examples folder if you want to save space & increase compilation time.
2. Directional Zoom 2D
For a quick start, watch the above demo / tutorial.
- to use directional zoom, simply add the DirectionalZoom.cs component to the camera.
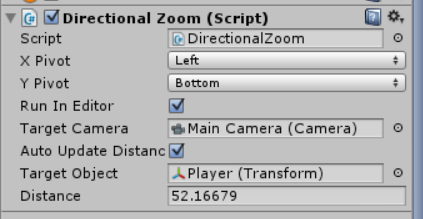
- Set the desired pivots (for example, bottom left)
- and that's it.
- now, when you change the camera orthographic size in the editor or at run time by code, the camera will expand only to the top right in this example.
- to use directional zoom, simply add the DirectionalZoom.cs component to the camera.
- Set the desired pivots (for example, bottom left)
- and that's it.
- now, when you change the camera orthographic size in the editor or at run time by code, the camera will expand only to the top right in this example.
Parameters:
- Run In Editor : if checked, then the asset will work at edit time in the unity editor.
- Target Camera : the camera that this asset will work on.
- Other Parameters : only needed for the experimental 3d directional zooming feature, documented below.
- Run In Editor : if checked, then the asset will work at edit time in the unity editor.
- Target Camera : the camera that this asset will work on.
- Other Parameters : only needed for the experimental 3d directional zooming feature, documented below.
Smooth Zoom
to use smooth zoom:
1. add the smooth zoom component to the camera game object (or any game object)
2. set the target camera
3. set the smoothing ( larger smoothing means faster zooming)
1. add the smooth zoom component to the camera game object (or any game object)
2. set the target camera
3. set the smoothing ( larger smoothing means faster zooming)
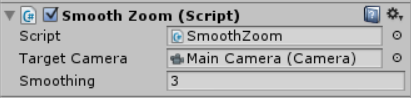
4. get a reference to the smooth zoom component in your code
5. now, smoothly zoom by calling ZoomTo(anySize) and StopZooming()
5. Example:
mySmoothZoom = GetComponent<SmoothZoom>();
mySmoothZoom.ZoomTo(5); // will zoom the camera to 5
mySmoothZoom.StopZooming(); // will stop zooming
6. you can also checkout the included smooth zoom example scene.
5. now, smoothly zoom by calling ZoomTo(anySize) and StopZooming()
5. Example:
mySmoothZoom = GetComponent<SmoothZoom>();
mySmoothZoom.ZoomTo(5); // will zoom the camera to 5
mySmoothZoom.StopZooming(); // will stop zooming
6. you can also checkout the included smooth zoom example scene.
Directional Zoom 3D (experimental)
checkout the below video to the 3D feature works :
How is 3D perspective zoom different from 2D zoom?
with 3D cameras, only one slice of the camera frustum can be zoomed directionally, that slice is determined by it's z distance from the camera.
How to use 3D Directional Zoom ?
A. Quick Setup
1. add the Directional Zoom Component to the camera.
2. set the desired pivots.
3. set target object (the player for example), which the camera will use as a reference to get the target frustum slice.
4. ensure auto update distance is checked
5. and that's it.
now, when you change the camera size in the editor or at run time by code, the camera will zoom directionally in the target frustum slice.

B. Optimizing Setup
if your target object distance from the camera doesn't change every frame, you can optimize performance by manually passing the DirectionalZoom component the desired distance.
1. disable Auto Update Distance
2. Get a reference to the directional zoom component.
3. when the target object z distance from camera change
- get the new distance by calling :
float newZDistanceToCamera = myDirectionalZoom.GetDistance ( myCamera, targetObject);
4. pass the new distance to the directional zoom component :
myDirectionalZoom.distance= newZDistanceToCamera;
5. that's it.
Loved it ?
then you will love :
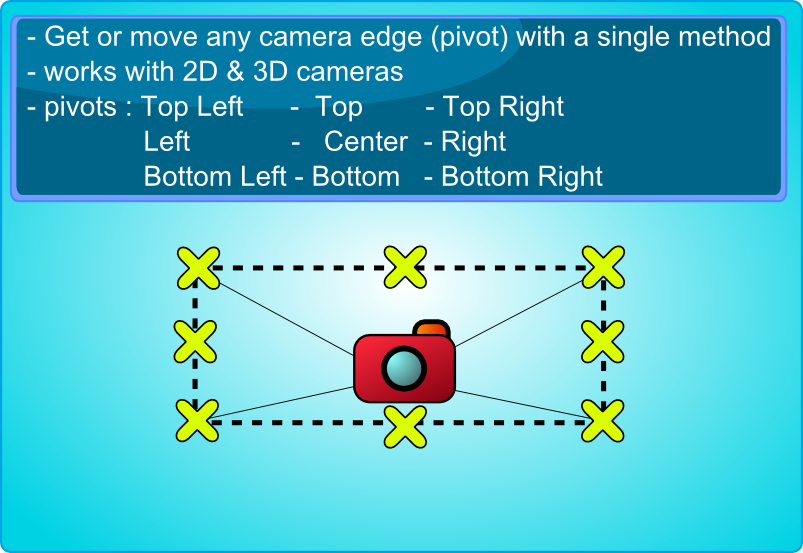
2. Camera Edges : get & move any camera edge with a single line of code